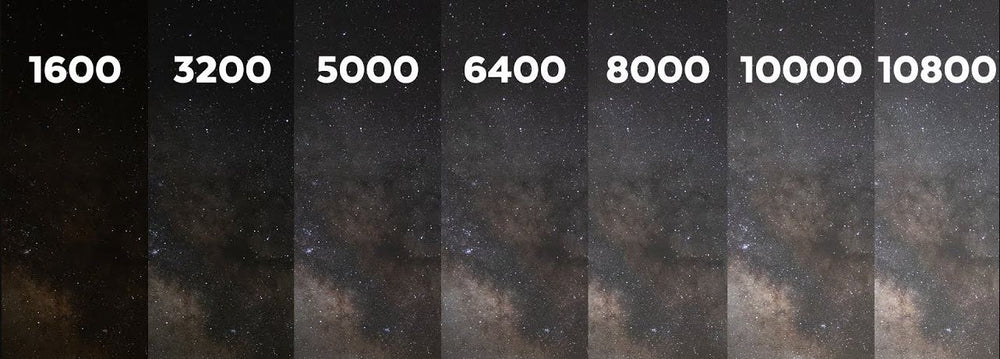
Mastering the Night Sky: Finding the Best ISO for Long Exposure Astrophotography
Introduction to ISO and Astrophotography
ISO, along with shutter speed and aperture, is one of the three cornerstones of photography known as the exposure triangle. In astrophotography, selecting the right ISO setting is crucial for capturing breathtaking images of celestial objects. This comprehensive guide will provide valuable insights into the role of ISO in long exposure astrophotography and help you find the best ISO setting for your specific camera and conditions.
The Importance of ISO in Long Exposure Astrophotography
ISO determines your camera sensor's sensitivity to light. A higher ISO setting increases sensitivity, allowing you to capture more light in a shorter amount of time. However, higher ISO settings can also introduce digital noise and grain into your images, reducing overall image quality. Balancing sensitivity and noise is essential for achieving stunning long exposure astrophotography results.
Factors Affecting the Best ISO for Long Exposure Astrophotography
- Camera Model: Different cameras have varying levels of noise performance at specific ISO settings. It's essential to understand your camera's capabilities to choose the best ISO setting for long exposure astrophotography.
- Light Pollution: The amount of light pollution in your shooting location can influence the optimal ISO setting. In areas with high light pollution, a lower ISO setting can help reduce the impact of light pollution on your images.
- Target Object: The brightness of the celestial object you're photographing will also affect the ideal ISO setting. For example, capturing faint deep-sky objects may require a higher ISO setting compared to photographing the Moon or bright planets.
How to Choose the Best ISO for Your Camera and Conditions
- Research Your Camera's Capabilities: Consult your camera's manual or online resources to determine its ISO performance and the recommended ISO settings for astrophotography.
- Test Different ISO Settings: Experiment with various ISO settings while shooting the same celestial object. Compare the results to determine which ISO setting provides the best balance of sensitivity and noise reduction for your specific camera and conditions.
- Consider Using a Light Pollution Filter: If you're shooting in a light-polluted area, a light pollution filter can help improve image quality by reducing the effects of light pollution and allowing you to use higher ISO settings with less noise.
Examples of Best ISO Settings for Popular Cameras
While the ideal ISO setting will vary depending on your specific camera and conditions, here are some general guidelines for popular camera models:
- Canon EOS Rebel T7i/800D: ISO 800-1600
- Nikon D7500: ISO 800-3200
- Sony A7III: ISO 800-3200
These examples should be used as a starting point, and you should always experiment with different settings to find the best ISO for your specific camera and conditions.
Tips for Optimizing Your Astrophotography Results
- Use a Sturdy Tripod: A stable platform is crucial for long exposure astrophotography. Invest in a high-quality tripod to minimize camera shake and ensure sharp, clear images.
- Shoot in RAW Format: RAW files contain more information and offer greater flexibility in post-processing, allowing you to extract more detail and reduce noise in your final images.
- Utilize Image Stacking Techniques: Combine multiple exposures using specialized astrophotography software to create a final, high-quality image with reduced noise and improved detail.
- Experiment with Exposure Times: Longer exposure times will capture more light and detail in your astrophotography images. However, extremely long exposures may introduce star trails due to the Earth's rotation. Experiment with different exposure lengths to find the best balance for your equipment and conditions.
- Employ Dark and Bias Frames: Dark and bias frames help correct for sensor noise and hot pixels in your images, improving overall image quality. Incorporate these calibration frames during image stacking for optimal results.
Frequently Asked Questions About ISO and Long Exposure Astrophotography
- Can I use auto ISO for long exposure astrophotography? While auto ISO can be convenient for general photography, it's not recommended for long exposure astrophotography. Manually selecting the ISO setting allows you to maintain greater control over your camera's sensitivity and noise levels, resulting in higher-quality images.
- How do I reduce noise in my astrophotography images? Reducing noise in astrophotography images can be achieved by using the optimal ISO setting for your camera, capturing and using dark and bias frames during image stacking, and employing noise reduction techniques during post-processing.
- What is the "500 Rule" in astrophotography? The "500 Rule" is a guideline to help photographers avoid star trails in their images due to the Earth's rotation. The rule suggests dividing 500 by your camera's focal length to determine the maximum exposure time in seconds before star trails become noticeable. For example, with a 50mm lens, you would calculate 500 ÷ 50 = 10 seconds as the maximum exposure time.
Conclusion
Selecting the best ISO for long exposure astrophotography is an essential aspect of capturing stunning celestial images. By understanding the factors affecting ISO and experimenting with different settings, you can find the optimal balance between sensitivity and noise reduction for your specific camera and conditions. With patience, practice, and a keen eye for detail, you'll be well on your way to mastering the art of long exposure astrophotography and capturing breathtaking images of the night sky. Clear skies and happy shooting!
More Astrophotography Topics:
- Astrophotography Equipment for Beginners
- Astrophotography for Beginners
- Best Camera for Astrophotography
- Best Telescope for Astrophotography
- Best Telescope for Deep Space Astrophotography
- What Equipment Do I Need for Astrophotography
- Astrophotography Camera Settings
- Astrophotography Image Processing
- Night Sky Astrophotography Tips
- Milky Way Astrophotography Tips
- Beginner Deep Sky Astrophotography Targets
- Astrophotography Setup for Beginners
- Astrophotography Tips for Beginners
- Astrophotography for Dummies
- Astrophotography Image Editing Software
- Astrophotography Focusing Techniques
- Best Astrophotography Star Tracking Mount
- Best Beginner Astrophotography Targets
- Best Image Stacking Software for Astrophotography
- Best Narrowband Astrophotography Targets
- Astrophotography Targets by Month
- Good Widefield Astrophotography Targets
- GIMP Astrophotography Plugins
- Flat Frames Astrophotography
- Bias Frames Astrophotography
- Dark Frames Astrophotography
- Calibration Frames Astrophotography
- Dithering Astrophotography
- What is Astrophotography
- Starnet Astrophotography
- Star Tracker Astrophotography
- Best Astrophotography Books
- Astrophotography Setups Under $2000
- Best Phone Tripod for Astrophotography
- Removing Brown Tones Astrophotography Images
- Best Focal Length for Deep Space Astrophotography
- Best Guide Scope for Astrophotography
- Do I Need a Guide Scope for Astrophotography
- Astrophotography Targets by Focal Length
- Astrophotography Binning
- Astrophotography Exposure Time
- Bortle Scale
- Tripod Position

