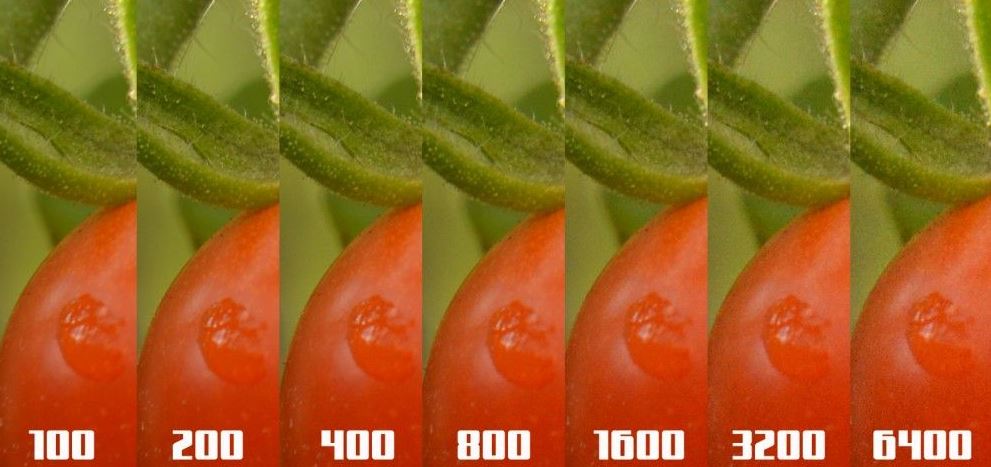
What is ISO in Photography?
Introduction to ISO in Photography
If you've ever delved into the world of photography, you've likely come across the term "ISO." Understanding ISO is crucial for capturing stunning photos, as it is one of the three essential components of the exposure triangle. In this comprehensive guide, we'll explore what ISO is, its relationship with shutter speed and aperture, how to choose the right setting, and much more. By mastering ISO, you'll be on your way to creating the perfect shot in any lighting condition.

ISO in Photography Simple Definition:
ISO in photography refers to the sensitivity of the camera's image sensor to light. It is one of the three factors, along with aperture and shutter speed, that determines the exposure of a photograph.
In simple terms, a higher ISO setting makes the sensor more sensitive to light, allowing you to capture images in low-light conditions. However, increasing the ISO may introduce digital noise or graininess to the photo. On the other hand, a lower ISO setting is suitable for well-lit situations but may require longer shutter speeds or wider apertures to achieve proper exposure. Photographers often adjust ISO based on the lighting conditions and the desired creative effect for their photos.
The Relationship Between ISO, Shutter Speed, and Aperture
Before diving into ISO, it's important to understand its connection to the other two components of the exposure triangle: shutter speed and aperture. Here's a brief overview of each:
- ISO: Refers to the sensitivity of your camera's sensor to light. A higher ISO value means increased sensitivity and a brighter image, while a lower ISO value results in decreased sensitivity and a darker image.
- Shutter Speed: The amount of time the camera's shutter remains open, allowing light to reach the sensor. Faster shutter speeds freeze motion, while slower speeds can create motion blur.
- Aperture: The size of the opening in the lens that allows light into the camera. A wider aperture (smaller f-number) lets in more light, while a smaller aperture (larger f-number) allows less light.
Balancing these three elements is crucial for achieving the correct exposure in your images. For example, if you're shooting in low light conditions, you may need to increase your ISO to maintain a fast enough shutter speed to avoid blur or to keep the aperture at an optimal value for depth of field.
How to Choose the Right ISO Setting
Selecting the ideal ISO setting can be a bit of a balancing act, but here are some general guidelines to follow:
- Start with the lowest possible ISO: In most cases, it's best to start with the lowest ISO setting your camera offers (usually ISO 100 or 200). This provides the best image quality and minimizes noise.
- Adjust based on lighting conditions: In bright conditions, you may be able to maintain a low ISO, while in dimmer environments, you'll need to increase the ISO to compensate for the lack of light.
- Consider your shutter speed and aperture: If you need a fast shutter speed to capture action or a specific aperture for depth of field, you may need to adjust your ISO accordingly.
- Monitor noise levels: As you increase ISO, be aware of the potential for increased noise in your images. Noise can be minimized through camera settings or post-processing, but it's best to avoid excessive noise when possible.

Pros and Cons of High ISO
High ISO values can be beneficial in certain situations, but they also come with drawbacks. Here's a rundown of the pros and cons:
Pros:
- Allows for faster shutter speeds, which can help freeze action or reduce camera shake.
- Enables shooting in low-light conditions without a flash.
- Can help achieve a desired aperture for depth of field.
Cons:
- Increased noise and grain, which can diminish image quality.
- Loss of detail and dynamic range in photos.
- Overexposure risk when shooting in bright conditions.
Pros and Cons of Low ISO
Low ISO values offer several advantages and a few potential drawbacks. Here's an overview of the pros and cons:
Pros:
- Produces the highest image quality with minimal noise and grain.
- Retains more detail and dynamic range in photos.
- Ideal for shooting in bright conditions or with a tripod.
Cons:
- May require slower shutter speeds, increasing the risk of camera shake or motion blur.
- Limited low-light shooting capabilities without a flash or additional light source.
- May necessitate a wider aperture, reducing depth of field.
Auto ISO – When and How to Use It
Many cameras offer an Auto ISO feature, which automatically adjusts the ISO based on the lighting conditions and other exposure settings. This can be a helpful tool, particularly for beginners or in situations where lighting is changing rapidly. Here are some tips for using Auto ISO effectively:
- Understand your camera's Auto ISO range: Check your camera's settings to determine the range of ISO values it will choose from in Auto mode. Make sure the range is suitable for the situation you're shooting in.
- Set a minimum shutter speed: Some cameras allow you to set a minimum shutter speed when using Auto ISO. This can help prevent motion blur or camera shake while still allowing the camera to adjust ISO as needed.
- Monitor noise levels: Keep an eye on the ISO values your camera selects in Auto mode and ensure the noise levels remain acceptable. If noise becomes a concern, consider adjusting your aperture or shutter speed or switching to manual ISO control.
Common ISO Misconceptions
There are a few common misconceptions surrounding ISO in photography. Let's debunk some of these myths:
- Higher ISO always means more noise: While it's true that higher ISO values generally result in increased noise, modern cameras have improved noise performance. In many cases, you can use higher ISO settings without significantly compromising image quality.
- You should never use high ISO: High ISO values have their place, particularly when shooting in low-light conditions or when fast shutter speeds are required. Don't be afraid to use higher ISO settings when necessary, but be mindful of the potential trade-offs.
- Low ISO is always best: While low ISO values generally produce the highest image quality, there are situations where a higher ISO may be necessary to achieve the desired exposure or accommodate specific shutter speed and aperture requirements.
ISO Tips for Different Photography Styles
Different photography styles may require unique approaches to ISO settings. Here are some tips for various genres:
- Landscape photography: Aim for the lowest ISO possible to maximize image quality, and use a tripod to enable slower shutter speeds if needed.
- Portrait photography: Use a low to moderate ISO to minimize noise and maintain detail. Adjust as necessary based on lighting conditions and desired depth of field.
- Sports and action photography: Opt for higher ISO settings to enable faster shutter speeds and freeze motion, but monitor noise levels to ensure image quality remains acceptable.
- Night and low-light photography: Embrace higher ISO values to capture images in low-light situations without a flash, but consider using a tripod or image stabilization to minimize camera shake.
Frequently Asked Questions About ISO in Photography
- What is the best ISO for outdoor photography? In bright conditions, start with the lowest ISO setting (typically ISO 100 or 200) for the best image quality. Adjust as necessary based on your desired shutter speed and aperture.
- How does ISO affect image quality? Higher ISO values result in increased sensor sensitivity and brighter images, but they can also introduce more noise and grain. Lower ISO values produce cleaner images with less noise, but may require slower shutter speeds or wider apertures.
- Is it better to have a higher or lower ISO? There is no one-size-fits-all answer, as the optimal ISO depends on the shooting conditions and your creative goals. In general, use the lowest ISO possible for the best image quality, but don't hesitate to increase ISO when necessary to achieve the desired exposure, shutter speed, or aperture.
Conclusion
Mastering ISO in photography is an essential skill for capturing stunning images in a variety of lighting conditions. By understanding the relationship between ISO, shutter speed, and aperture, you'll be able to make informed decisions about the ideal ISO settings for your particular shooting scenario. Don't be afraid to experiment with different ISO values, and remember to keep an eye on noise levels to ensure your images maintain the highest possible quality. With practice and a solid understanding of ISO, you'll be well on your way to creating breathtaking photos that stand out from the crowd.
More Camera Topics:
- When Was the Camera Invented
- Best Planetary and Lunar Cameras
- Astronomy Camera Color or Mono
- Mirrorless Camera vs DSLR
- Canon M50 Review
- Nikon D5600 Review
- Canon EOS R6 Review
- Best Lens for Astrophotography Canon
- Best Lens for Astrophotography Nikon
- Best Lens for Astrophotography Sony A7iii
- Best Lens for Astrophotography Fujifilm
- Best Lenses for Astrophotography


